You’ve got a blank wall staring at you and a Pinterest board full of ideas. You want something that feels you — not a carbon copy of a catalogue spread. But the moment you start pulling out prints, frames, and that quirky little mirror you love… you freeze.
“Does this even go together?”
“Is this too much?”
“How do people make this look so effortless?”
If that sounds like the inner monologue running in your head, you’re not alone. Curating a collage wall can feel like a balancing act between creative freedom and complete chaos. But here’s the good news: with a few simple rules (and permission to break them), you can pull together a wall that looks considered, stylish, and personal — no art degree needed.
In this guide, you’ll get practical, easy-to-follow tips on how to mix prints, frames, and media like a pro — whether you’re working with thrifted finds, family photos, or a mix of both. You’ll walk away knowing how to bring your wall to life with confidence and style.
Step 1: Start with a vibe
Before you even think about where things go on the wall, start by asking this: What do I want this wall to feel like? Not just look like — feel like.
This is your vibe. It sets the tone for everything else.
Do you want something minimal and calming? Maybe black-and-white photography, thin black frames, and lots of negative space.
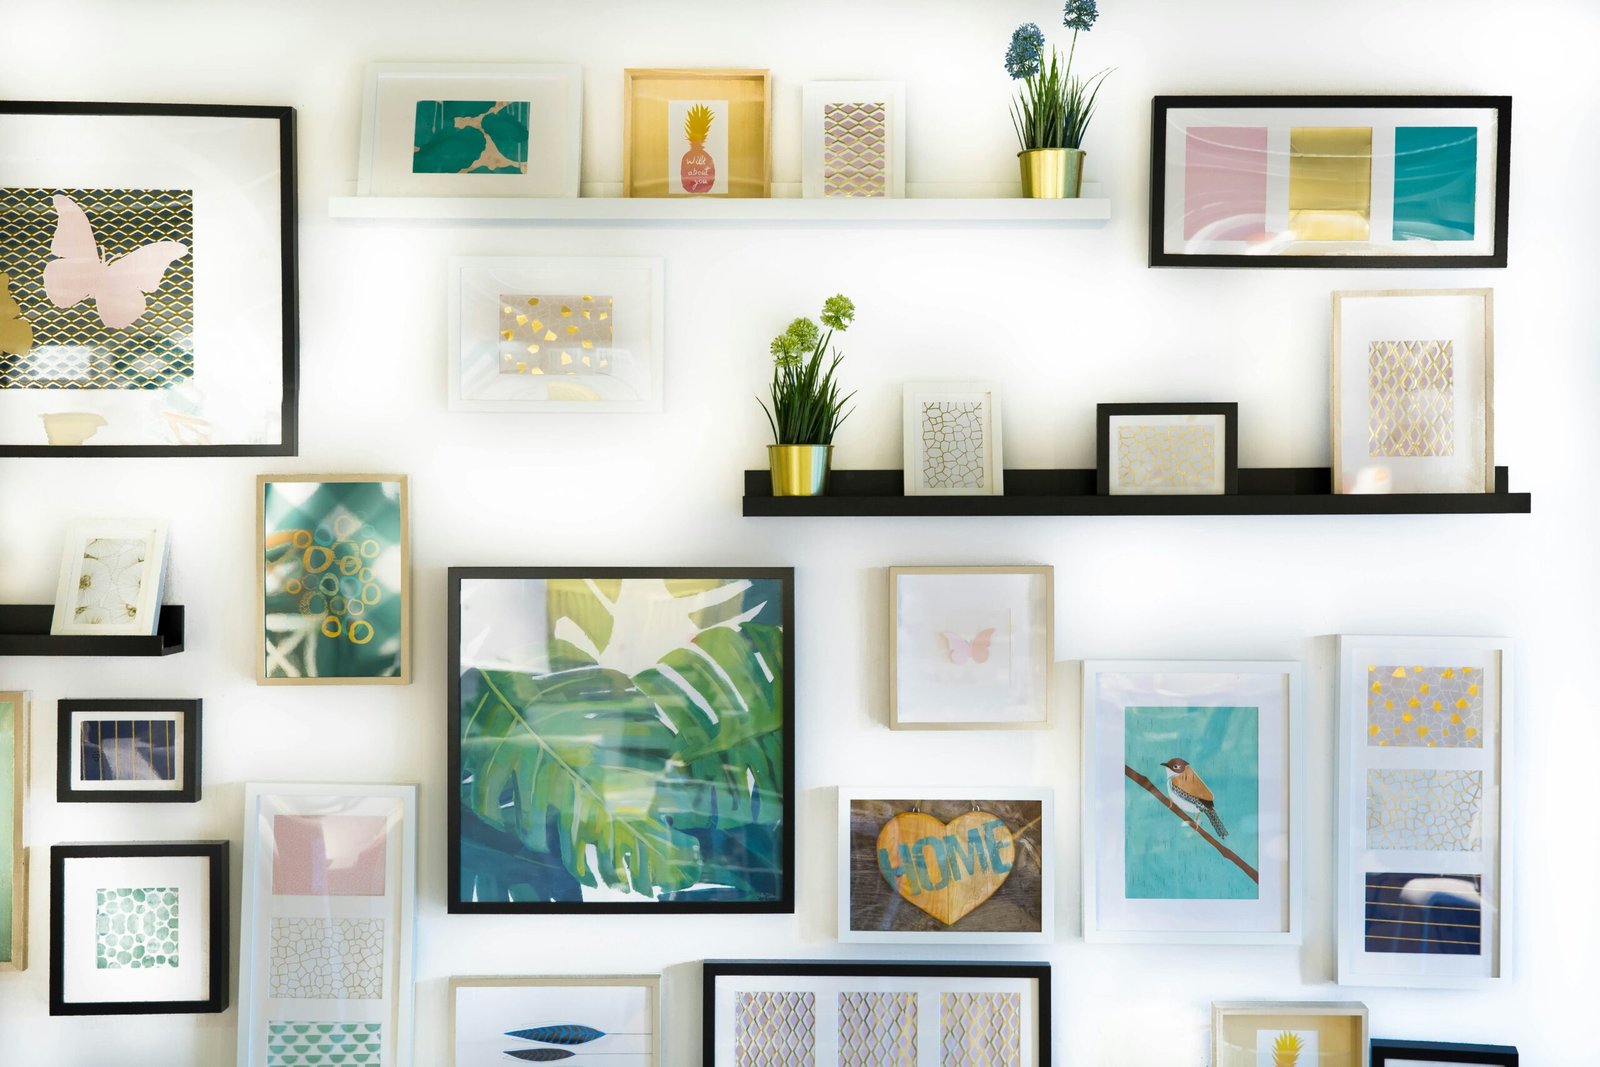
Or something bold and eclectic? Think loud colours, mismatched vintage frames, playful art, and layered textures.
You don’t need a rigid theme — in fact, too much structure can kill creativity. But having a vibe helps you make decisions that feel cohesive instead of chaotic.
Here are a few vibe ideas to spark your direction:
- Modern Minimalist – Clean lines, monochrome prints, white or black frames, grid layout.
- Boho Eclectic – Natural textures, handmade prints, mismatched frames, warm tones.
- Art School Cool – Sketches, abstracts, vibrant colours, maybe a pop of neon or spray paint art.
- Vintage Collector – Old postcards, sepia photos, pressed flowers, ornate gold frames.
- Coastal Calm – Soft blues, beach photography, whitewashed wood frames, breezy layouts.
Not sure what yours is yet? Try laying out your favourite pieces together on the floor and see what mood they create. Often your personal style will shine through without much effort — you just need to spot the common thread.
Step 2: Mix your media
Here’s where your collage wall starts to feel interesting — and not like it was pulled straight out of a pre-made frame kit.
A great collage wall isn’t just a bunch of framed prints. The real magic happens when you start blending different types of pieces together. It adds texture, personality, and makes the whole wall feel like a story instead of a shop display.
Here’s what you can include beyond just art prints:
- Photography – Personal snapshots or vintage film photos can ground the wall in real emotion.
- Textiles – A small woven piece, macramé, or fabric swatch brings in softness and dimension.
- Mirrors – Round or unusual mirrors break up the rectangles and bounce light around.
- Objects – Think small shelves, decorative plates, pressed flowers, or even hats.
- Typography – Quotes, letters, or signage add a graphic touch and a little punch.
- Canvas or wood panels – These break up the frame repetition and add depth.
You don’t need to include everything — just 2 or 3 different types of media is enough to create visual variety. If everything’s the same format (say, a dozen prints in black frames), it can start to feel flat. Adding even just one or two “surprise” pieces makes the wall feel more curated and intentional.
And if you’re worried about it feeling too mismatched — don’t. The trick is that the variety is the cohesion, especially when you’ve already set your vibe. Trust that contrast can be a design tool.
Step 3: Frame game
This is where a lot of people overthink things — and where a lot of the style actually comes from. Your frames don’t all need to match, but they do need to make sense together.
The key? Intentional contrast.
Here’s how to pull it off:
🔲 Mix styles — but anchor with repetition
You can absolutely combine ornate vintage frames with clean modern ones, or wood with metal. But repeat one element throughout — maybe the colour black shows up in three different frames, or you use natural wood in two or three places. That little echo is what keeps it from feeling random.
🔲 Vary your sizes
Don’t be afraid of variety. Mixing small, medium and large frames creates a more dynamic look. Just make sure you balance it — don’t put all the heavy, big frames on one side. Spread the visual weight.
🔲 Add a few standout frames
Think of these as the “accent chairs” of your wall — a gold baroque frame, a circular one, or something brightly coloured. They should be special, not dominant.
🔲 Keep mats in mind
Adding a mat (that white border inside a frame) gives breathing room to the artwork and elevates the look. You can even use oversized mats for a more gallery-style feel.
Quick cheat for balance:
If you’re worried it’s looking too busy — pull back and squint. If one part of the layout is drawing too much attention, swap a frame or two around to rebalance.
Bottom line: it doesn’t have to match — it just has to talk to each other. A good collage wall is like a dinner party: not everyone looks the same, but they all bring something to the table.
Step 4: Layout before you hang
This is the make-or-break moment. Even the most beautiful prints and perfectly chosen frames can look off if the layout feels unbalanced. But here’s the trick: you don’t have to figure it out on the wall. You plan it on the floor first.
Here’s how to map it out:
🧺 Lay everything on the floor
Clear some space and arrange your frames and pieces on the floor — just like they’ll go on the wall. This lets you test combinations, spacing, and balance without committing to nails or adhesives. Snap photos as you go, so you can review and tweak.
📄 Use paper templates
Cut pieces of brown paper, newspaper, or even wrapping paper to match the size of your frames. Tape them to the wall with painter’s tape and move them around until the layout feels right. It saves a ton of time and keeps you from putting 14 holes in the wall.
🎯 Start from the centre
Whether you’re going for a grid, a loose cloud shape, or a structured column, it helps to start from the centre or a main anchor piece and build outward. This keeps your wall from “drifting” as you go.
📏 Mind the spacing
A good rule of thumb: keep about 5–8cm between pieces. Too close looks cramped, too far feels disconnected. But it doesn’t need to be exact — a little variation keeps it natural.
🌀 Don’t aim for perfection
Symmetry isn’t required. In fact, too much of it can feel stiff. You want balance, not a ruler-straight lineup. Think rhythm over precision.
This stage is all about visual flow. You’re creating a rhythm your eye can follow — a conversation between the pieces.
Step 5: Hanging hacks
You’ve planned the layout, picked your pieces — now it’s time to get them on the wall without wrecking it. Whether you rent, own, or just hate committing, there’s a way to hang your collage wall that works for you.
🛠️ Tools & tricks that make life easier:
🔨 Nails and picture hooks (classic)
The old-school method still works — just use proper picture hooks so your wall doesn’t end up a mess. For heavier pieces, go for wall anchors. And always measure twice, hammer once.
🧲 Command strips (renter’s dream)
Perfect for lightweight frames and pieces. They hold surprisingly well, leave no residue, and let you reposition if you get it wrong the first time. Just make sure to clean the wall before applying.
🪜 A spirit level (or a level app)
Nothing ruins a stylish collage wall faster than wonky frames. Use a level to keep everything straight — or at least intentionally tilted if that’s your vibe.
🧵 Wire or string for gallery-style displays
Want something more flexible? Run a length of twine or wire across a wall and use clips to hang prints, postcards, or even small fabric pieces. It’s casual, creative, and easy to update.
📏 Use a laser level for large walls
If you’re going big, a laser level saves time and helps you keep things aligned without constantly reaching for a tape measure.
Bonus tip: work from the middle out
Start with your anchor piece (usually the largest or most eye-catching item), then build around it. It’s much easier than trying to “fit” a centrepiece into a finished outer edge.
Final Tips: Make It Personal (and Know When to Stop)
At this point, you’ve got the bones of your collage wall — but the last 10% is what gives it soul. Here’s how to make sure it feels like you, not just something that looks good in photos.
💬 Tell your story
Don’t just fill the wall with “decor.” Add pieces that mean something — a postcard from a trip, a doodle from your kid, a print from your favourite local artist. These are the things that spark joy every time you walk past.
✂️ Don’t overfill it
There’s a fine line between layered and cluttered. You don’t have to use every frame or piece you own. Leave some breathing room — it gives your eyes a place to rest and makes each piece stand out more.
🧠 Trust your instincts
If something feels off, it probably is. Step back, take a break, or sleep on it. Sometimes fresh eyes in the morning make all the difference.
🪄 You can always change it later
Your collage wall doesn’t have to be permanent. That’s part of the beauty. Swap out pieces, shift the layout, grow the collection over time. It’s not a museum exhibit — it’s your space, and it can evolve with you.
Your wall doesn’t need to be perfect — it just needs to feel right. With a little planning, a bit of play, and a dose of boldness, you can turn any blank wall into a collage that looks effortlessly cool and completely yours.
Alex is the creator of Homely Haven, a space dedicated to simple, stylish ideas for interiors and gardens alike. With a passion for cozy living rooms, inviting outdoor spaces, and practical DIY solutions, Alex shares tips and guides that help turn any house into a true home.
From budget-friendly decorating hacks to weekend garden projects, the goal is always the same: to inspire you to create spaces that feel personal, beautiful, and welcoming. When not writing, Alex is usually rearranging furniture, sketching new garden layouts, or exploring design trends for the next project.


