Stop me if this sounds familiar:
You’re scrolling through garden inspiration photos, picturing a chilled weekend on a gorgeous patio with homemade lemonade, fairy lights overhead, and a sleek little bench you built yourself. But then reality kicks in. You don’t have the tools. Or the skills. Or the time. And definitely not the budget for those expensive ready-made sets.
Here’s the truth: you don’t need to be a seasoned DIYer, and you definitely don’t need a shed full of tools to build beautiful, functional garden furniture. All you need is the right project — something straightforward, budget-friendly, and actually doable with basic materials and a bit of motivation.
This article gives you just that.
You’ll find a curated list of easy DIY garden furniture projects you can tackle over a weekend — whether you’re in a flat with a balcony or a house with a full-sized garden. You’ll also get tips on materials, customising your pieces to suit your style, and avoiding the common mistakes that trip people up.
Let’s get started — your dream outdoor space is a few planks of wood away.
Before You Start: Quick Prep Guide
Before you dive into cutting wood or assembling crates, a bit of planning will save you time, frustration, and money. You don’t need a garage full of gear or a trade background — just a few basic tools, some smart material choices, and a quick understanding of the essentials.
Tools You’ll Actually Use
Don’t worry — this isn’t a DIY fantasy shopping list. These are the basics that will get you through almost any project on this list:
- Cordless drill (with screwdriver bits) – your new best friend
- Measuring tape – accuracy saves a lot of do-overs
- Hand saw or jigsaw – either will do for simple cuts
- Sandpaper or sanding block – no splinters, no regrets
- Wood screws – make sure they’re outdoor-rated
- Paintbrush or roller – for sealing or painting
If you don’t already own these, most DIY stores sell beginner tool kits, and many places now offer tool hire.
What Materials Should You Use?
Stick to treated timber or decking boards — they’re made to handle the outdoors and won’t warp or rot easily. You can also find pre-cut timber slats at B&Q, Wickes or even IKEA, which means less cutting for you.
For smaller projects or accents, concrete blocks, timber crates, or paving slabs can all be used creatively and still look modern.
- Untreated pine (unless you seal it well)
- Cheap MDF or chipboard — not made for moisture
- Anything already falling apart (yes, even that sad old pallet)
Seal It or Lose It
Once your furniture is built, finish it properly:
- Use outdoor wood stain, paint, or a clear sealant to protect it from rain and sun.
- Make sure everything is dry before applying, and give it a few hours (or ideally a day) to cure before leaving it outside.
Sketch It Out
Grab a scrap of paper and sketch your plan — even a rough drawing helps. Measure your space and check the final size of your build before you start cutting.
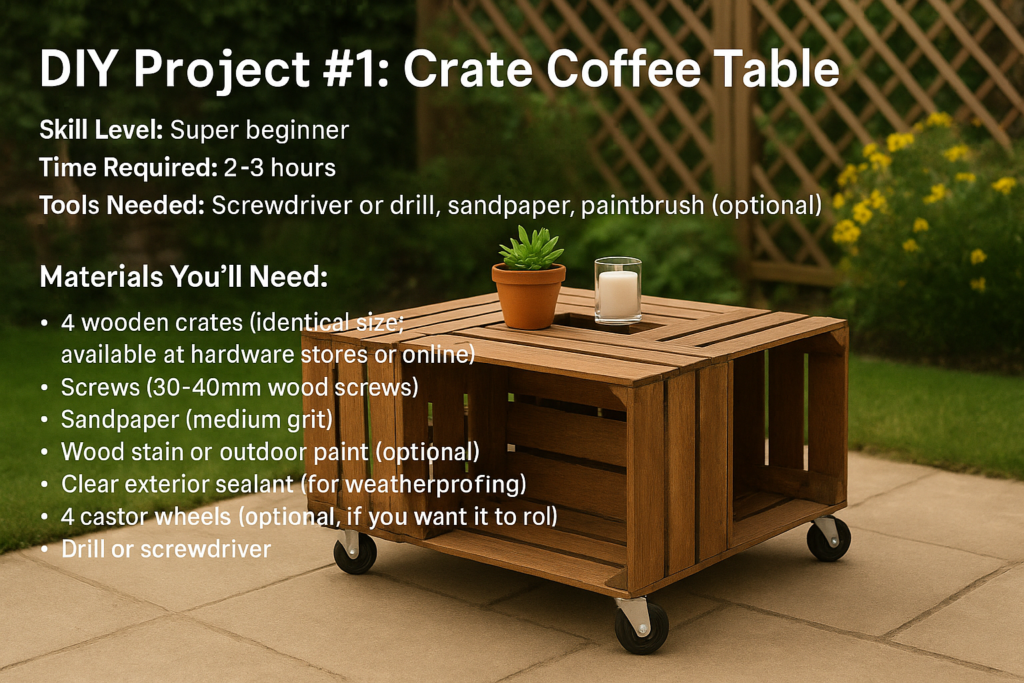
DIY Project #1: Crate Coffee Table
Skill Level: Super beginner
Time Required: 2–3 hours
Tools Needed: Screwdriver or drill, sandpaper, paintbrush (optional)
Why Build This?
This crate coffee table is stylish, functional, and takes minimal effort. It adds storage and charm to any outdoor space — and you can customise it to fit your garden’s vibe. Plus, no precise cuts or complicated joinery involved.
Materials You’ll Need:
- 4 wooden crates (identical size; available at hardware stores or online)
- 1 square plywood board or paving slab (optional – for the centre or top)
- Screws (30–40mm wood screws)
- Sandpaper (medium grit)
- Wood stain or outdoor paint (optional)
- Clear exterior sealant (for weatherproofing)
- 4 castor wheels (optional, if you want it to roll)
- Drill or screwdriver
- Wood glue (optional, for extra stability)
Step-by-Step Instructions:
Step 1: Prep Your Crates
Start by giving each crate a quick sanding. Focus on rough edges and splinters — especially if you’ll be using this table around kids or with bare legs in summer.
Pro Tip: If you’re staining or painting, now’s the time to do it. Let everything dry completely before assembly.
Step 2: Arrange the Crates
Place the crates on their sides in a square formation. The openings should all face outward — this gives you built-in storage shelves on all four sides.
You’ll see a square space in the middle — you can either leave this open or add a centrepiece (like a square board or plant pot).
Step 3: Join the Crates Together
Use your drill and screws to attach each crate to its neighbour. Drill through the side of one crate into the edge of the next. Repeat until all four are securely attached.
Optional: Use wood glue at each join for extra strength before you screw them together.
Step 4: Add the Base (Optional)
If you want to add a plywood base underneath (to make it more solid) or a centre board in the middle gap, measure and cut it now. Screw or glue it in place.
If you’re going mobile, screw the castor wheels onto the bottom corners.
Step 5: Seal and Protect
Once assembled, brush on a clear outdoor sealant. Even if you don’t paint or stain, sealing the wood helps it last longer in the elements. Allow to dry fully.
Step 6: Style It
Add a few small plants, candles, or a tray on top. You’ve got a handmade centrepiece that looks far more expensive than it cost to build.
Customisation Ideas
- Paint each crate a different pastel colour for a playful look
- Add a cushion on top and turn it into a footstool
- Use smaller crates to make a mini version for a balcony
DIY Project #2: Simple Timber Garden Bench
Skill Level: Beginner
Time Required: 2–4 hours
Tools Needed: Drill, saw (or pre-cut wood), tape measure, sander/sandpaper
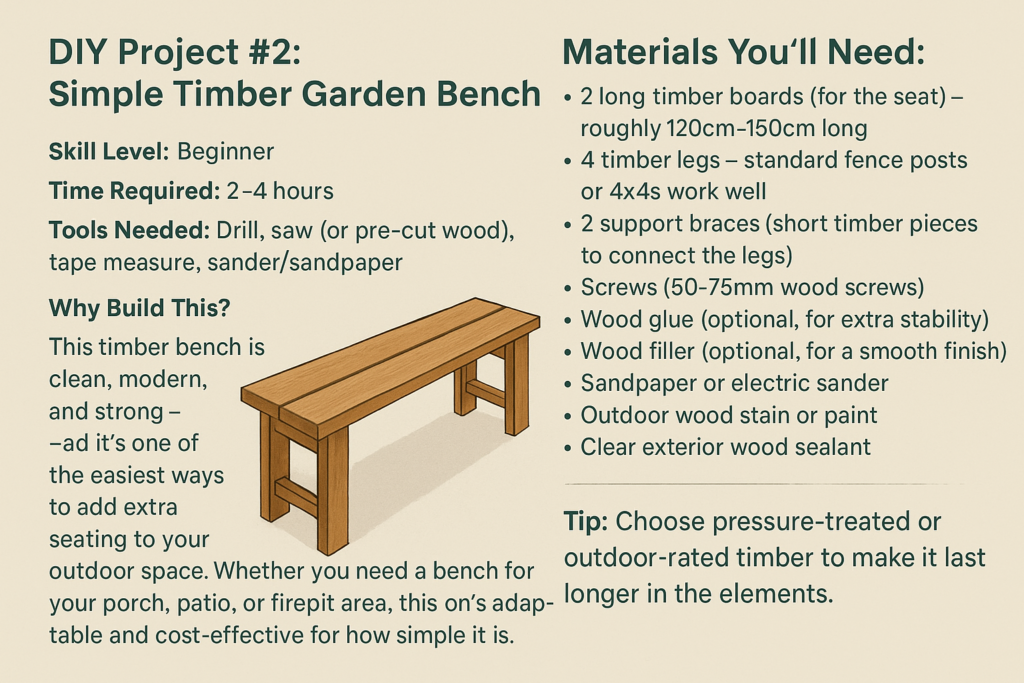
Why Build This?
This timber bench is clean, modern, and strong — and it’s one of the easiest ways to add extra seating to your outdoor space. Whether you need a bench for your porch, patio, or firepit area, this one’s adaptable and cost-effective. Plus, it’s surprisingly sturdy for how simple it is.
Materials You’ll Need:
- 2 long timber boards (for the seat) – roughly 120cm–150cm long
- 4 timber legs – standard fence posts or 4x4s work well
- 2 support braces (short timber pieces to connect the legs)
- Screws (50–75mm wood screws)
- Wood glue (optional for extra stability)
- Wood filler (optional, for a smooth finish)
- Sandpaper or electric sander
- Outdoor wood stain or paint
- Clear exterior wood sealant
Tip: Choose pressure-treated or outdoor-rated timber to make it last longer in the elements.
Step-by-Step Instructions:
Step 1: Sand Everything Smooth
Sand down all your timber pieces, especially the seat boards. You don’t want rough patches or splinters on something you’ll be sitting on.
Optional: If your wood has knots or gaps, use wood filler to even things out before staining or painting.
Step 2: Attach the Bench Top Boards
Lay your two seat boards side-by-side lengthwise with a small gap (2–3mm) between them for drainage. This will be the top of your bench.
Use two or three small pieces of timber underneath (called cleats) to screw the boards together from below. One at each end and one in the middle will do.
Step 3: Add the Legs
Flip the top over and mark where the legs will go — one at each corner, inset slightly from the edge (about 5cm in).
Attach each leg using two screws at a diagonal angle (or use brackets for extra support if needed). Make sure the legs are straight and sturdy.
Step 4: Add the Support Braces
Screw the horizontal braces between the legs on the long sides of the bench. This stops wobbling and adds strength.
If you want extra support, you can also add a cross brace between the two sets of legs underneath the bench.
Step 5: Finish and Seal
Give everything one final sand, then stain or paint in your chosen colour. Once dry, apply an exterior sealant for added weather resistance.
If you’re leaving it natural, use a clear UV-protective finish to prevent fading and warping.
Customisation Ideas
- Add a backrest by screwing on an upright plank
- Make it wider and turn it into a two-person lounger
- Use black paint and sleek legs for a modern Scandi vibe
- Add outdoor cushions or a bench pad for comfort
This project gives you a solid, attractive piece of furniture you’ll use for years — and it’s easy to scale up or down depending on your space.
DIY Project #3: Raised Planter with Built-in Seating
Skill Level: Beginner to intermediate
Time Required: Half a day to a full weekend (depending on size)
Tools Needed: Drill, saw, measuring tape, level, sander/sandpaper
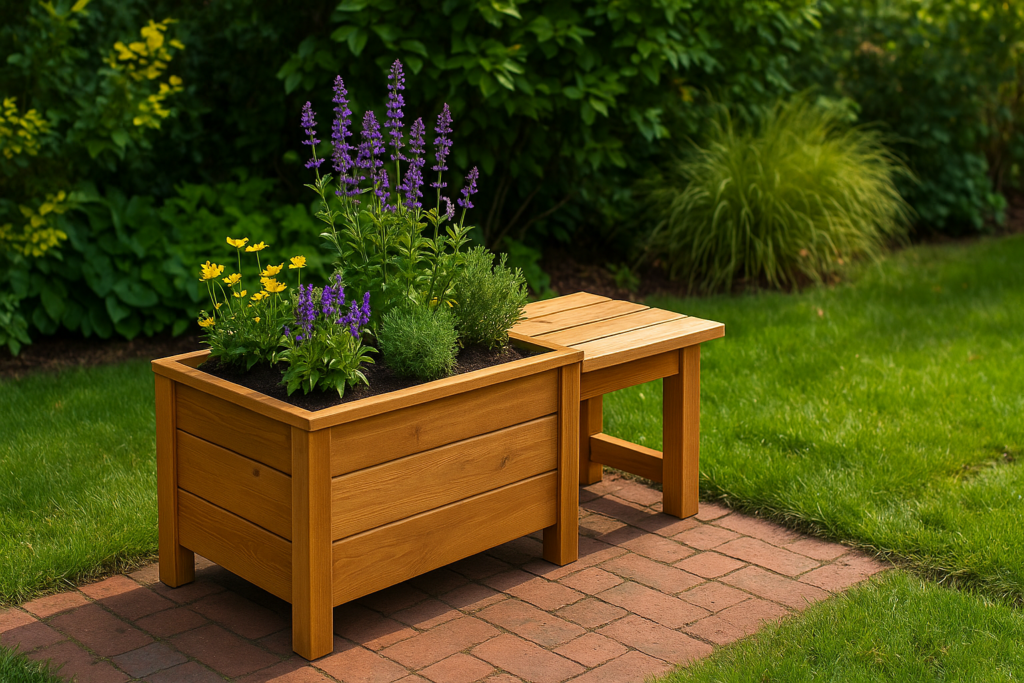
Why Build This?
It’s the perfect two-in-one project: a place to grow herbs or flowers and a place to sit with your morning coffee. This planter-bench combo is ideal for smaller gardens or patios where space needs to work twice as hard. Plus, it makes your outdoor area feel more designed and intentional.
Materials You’ll Need:
- Timber boards (decking boards work well) – for the planter walls and seat
- Corner posts (treated 2×2 or 4×4 timber)
- Liner fabric (weed membrane or pond liner)
- Screws (50–75mm exterior wood screws)
- Outdoor wood stain or sealant
- Soil and plants of your choice
Example dimensions (adjust to suit your space):
Planter box: 120cm (L) x 40cm (W) x 45cm (H)
Bench seat: extends 30cm from the side of the planter
Step-by-Step Instructions:
Step 1: Cut and Sand Your Wood
Measure and cut all your timber boards. You’ll need:
- 4 panels for the long sides of the planter
- 4 for the shorter ends
- 1–2 planks for the bench top (depending on width)
- 4 corner posts to hold it all together
Give everything a quick sand to remove splinters.
Step 2: Build the Planter Box
Lay out your four side panels and screw them into the corner posts to form a box. Check everything is square using a builder’s square or a tape measure.
Pro Tip: Pre-drill holes to stop the wood from splitting.
Step 3: Line the Planter
Use weed membrane or pond liner to line the inside. Staple or tack it to the inner edges, letting it drape inside the planter. Cut a few small holes in the bottom for drainage.
Optional: Add a base made from slats if you want a raised bottom — helpful if you’re placing this on a hard surface.
Step 4: Add the Bench Seat
On one side of the planter (usually the long edge), attach 2–3 seat planks across the top, overhanging it like a built-in bench. Use additional timber supports underneath the overhang to ensure it holds weight.
Screw the planks into the planter frame and into the support blocks. Make sure it’s level before tightening everything.
Step 5: Stain, Seal, and Fill
Apply wood stain or paint in your chosen finish, then top with a clear sealant. Once dry, fill the planter with soil and add your favourite plants or herbs.
Style Tip: Mix low herbs like thyme or creeping rosemary near the edge, and add something upright in the middle for height.
Customisation Ideas
- Paint the seat planks a different colour to make them pop
- Add a small backrest to the bench using extra boards
- Install the bench on both sides for double seating
- Place two planters side-by-side with a bench connecting them
This project instantly adds structure and life to your garden. Whether you’re working with a courtyard, balcony, or large lawn, it’s a practical and attractive upgrade.
DIY Project #4: Foldable Outdoor Side Table
Skill Level: Beginner
Time Required: 2–3 hours
Tools Needed: Drill, saw, measuring tape, hinges, sander/sandpaper
Why Build This?
You know that moment when you’re balancing a drink on the arm of your chair and thinking, I really need a table out here? This is your answer. A foldable side table is a space-saving hero — great for balconies, small patios, or even picnics in the park. It folds flat, stands sturdy, and looks stylish.
Materials You’ll Need:
- 2 timber planks (for the tabletop) – approx. 40cm x 20cm each
- 2 wooden battens or slats (for underside support)
- 4 narrow timber strips or slats (for foldable legs – approx. 45–50cm each)
- 2 pairs of hinges:
- 2 butt hinges (for folding legs)
- 2 strap or surface-mount hinges (for the tabletop joint)
- Screws (20–30mm for hinges)
- Wood glue (optional)
- Outdoor paint or stain
- Clear exterior sealant
Choose lightweight wood like pine for easier folding and carrying.
Step-by-Step Instructions:
Step 1: Prepare the Tabletop
Take your two timber planks and align them side-by-side to form a rectangle. Attach them together using two small battens across the underside — one near each short end. Screw them in place.
Optional: If you want the table to fold in the middle, use strap hinges to join the planks along their long edge instead of battens.
Step 2: Make the Foldable Legs
Create two “X” shaped legs using four narrow timber slats.
- Lay two slats over each other in an “X” shape.
- Drill a hole through the centre where they cross and attach them using a bolt and wing nut, or a short screw and washer if the legs won’t need to rotate.
Repeat for the second set.
Step 3: Attach the Legs to the Table
Position each “X” leg beneath the tabletop near each end.
Use butt hinges to attach the top of each leg to the underside of the tabletop, just inside the batten or hinge line. This lets the legs fold flat under the table when not in use.
Pro Tip: Check that the legs fold inward fully before finalising the screw placement.
Step 4: Test the Fold
Stand the table upright and test the fold.
The legs should swing out to support the table, and fold inward flat for storage. If it wobbles, adjust your hinges or add a brace across the bottom of the “X” for stability.
Step 5: Sand, Paint, and Seal
Smooth all surfaces, especially the tabletop edges.
Then apply your outdoor paint or stain, followed by a sealant to protect from rain and sunlight.
You can also add felt pads to the bottom of the legs if you’re using it on tiles or a deck.
Customisation Ideas
- Use coloured hinges for a pop of contrast
- Paint the top in stripes or patterns for a cheerful vibe
- Add a leather strap or handle so you can hang it up when not in use
- Use reclaimed wood for a rustic, weathered finish
You’ll wonder how you ever managed without this little table. It’s perfect for a glass of wine, a plant pot, or your current read — and folds away when you need space.
DIY Project #5: Outdoor Bar Cart (Drinks Trolley or Potting Station)
Skill Level: Intermediate (still beginner-friendly if you take your time)
Time Required: 1 day
Tools Needed: Drill, saw, measuring tape, sander, clamps (optional), paintbrush
Why Build This?
Whether you’re hosting a garden get-together or just want a practical potting station, this bar cart has your back. It’s a portable, multi-level table that holds drinks, tools, snacks, or plants — and you can wheel it wherever you need it. Bonus: it looks impressive but is totally doable with basic materials.
Materials You’ll Need:
- Timber slats or decking boards (for shelves and frame)
- 2 sturdy side panels or vertical timber posts (for the frame)
- 4 small castor wheels (2 with locks recommended)
- 4 corner brackets (optional but adds stability)
- Screws (40–60mm)
- Wood glue (optional)
- Handles (drawer pulls, rope, or cabinet handles)
- Sandpaper or sander
- Outdoor paint/stain + clear sealant
Suggested dimensions:
Height: ~90cm (standard counter height)
Width: ~60cm | Depth: ~35cm (fits comfortably on a patio)
Step-by-Step Instructions:
Step 1: Build the Side Frames
Start by building two rectangular frames that will serve as the sides of the cart.
Each frame needs:
- 2 vertical posts (~90cm)
- 2 horizontal slats (~35cm, one at top and one at base)
Screw or glue them together and make sure they’re square. These will hold your shelves in place.
Step 2: Create the Shelves
Cut timber slats or decking boards to ~60cm for the shelf length. You’ll need:
- 3–4 slats per shelf (depending on your design)
- 2 shelves total (one lower, one mid-height)
Sand them down and paint or stain if you like — this is easier before assembly.
Step 3: Assemble the Cart
Attach the shelf slats between the two side frames using screws. Start with the bottom shelf, flush with the base, then install the second shelf about halfway up. Use clamps or a second person to help hold things steady.
Optional: Use metal corner brackets inside the joints for added durability.
Step 4: Attach the Top Surface
Add slats across the top to form your serving surface. Screw them directly onto the top rails of the side frames.
You now have a full cart structure with two shelves and a top — looking good!
Step 5: Add Wheels and Handles
Screw castor wheels to each corner of the base. Locking wheels on one side will stop it from rolling away on uneven ground.
Then screw handles onto both sides (or just one if you want a clean look). Rope handles give a rustic feel; metal pulls feel more modern.
Step 6: Finish and Seal
Sand any rough spots, especially around the handles. Then finish with paint or stain in your chosen colour, and a clear outdoor sealant to protect against spills and rain.
Customisation Ideas
- Add hooks on the side for utensils or gardening tools
- Attach a towel rail or bottle opener
- Install a removable tray top
- Use black screws and hardware for an industrial look
Whether you’re shaking cocktails or repotting succulents, this bar cart brings serious function and style to your outdoor space.
DIY Project #6: Lounge Chair from Decking Boards
Skill Level: Intermediate
Time Required: One full day
Tools Needed: Drill, saw, sander, measuring tape, clamps (recommended)
Why Build This?
A solid lounge chair is the holy grail of outdoor comfort — and with a bit of care, you can build one that rivals high-end garden furniture without the price tag. This design uses standard decking boards and has a low-slung, relaxed shape that’s ideal for reading, sunbathing, or just sitting with a cold drink.
Materials You’ll Need:
- Decking boards (pressure-treated, 120mm wide recommended)
- Timber for frame support (2×2 or 2×4 for inner structure)
- Screws (50–75mm exterior-grade)
- Wood glue (optional)
- Sandpaper or electric sander
- Wood stain or paint
- Outdoor wood sealant
- Optional: outdoor cushion for added comfort
Suggested dimensions (adjust to fit your space):
Seat depth: ~55cm | Back height: ~90cm | Seat height: ~35cm | Width: ~60cm
Step-by-Step Instructions:
Step 1: Cut the Timber
You’ll need to cut:
- 2 long side pieces for the chair frame (these follow the seat-to-back angle)
- 2 front and back cross braces
- Several horizontal slats (decking boards) for the seat and backrest
- 2 armrests (optional, but adds comfort and style)
Pro Tip: Angle the long side pieces (roughly 100–110° between seat and backrest) to give that comfy lounge feel. A mitre saw is helpful here, but you can also cut a cardboard template to trace.
Step 2: Build the Frame
Assemble a rectangular base for the seat using your two side pieces and the front and back braces.
Then attach angled supports at the back to hold the upright backrest.
Clamp and screw everything together. Pre-drill holes to avoid splitting the wood.
Step 3: Add Seat and Back Slats
Space your decking boards evenly across the seat area and screw them down. Repeat for the backrest section, starting at the base and working up.
Leave 5–10mm gaps between boards for drainage and airflow.
Step 4: Add Armrests (Optional)
Cut and attach a decking board to the top of each side frame. Use short vertical supports to hold them up if needed. This step adds stability and a polished look.
Step 5: Sand, Finish, and Seal
Smooth every surface thoroughly — this is furniture you’ll actually touch and sit on. Then apply your chosen outdoor stain or paint, followed by a weatherproof sealant.
Let everything dry fully before use.
Customisation Ideas
- Paint the frame one colour and the slats another for a two-tone look
- Add a footrest or ottoman to match
- Use a bold-coloured cushion or throw for instant style
- Add a magazine rack to the side for a functional upgrade
This chair is a game-changer for your garden. It’s the kind of piece that makes your space feel put-together — and once you build one, you’ll want to make a second.
DIY Project #7: Outdoor Storage Bench
Skill Level: Intermediate
Time Required: 1 full day
Tools Needed: Drill, saw, measuring tape, sander, hinges
Why Build This?
It’s one of the most practical things you can add to your outdoor space — a bench you can actually sit on and store things in. Whether it’s garden tools, cushions, kids’ toys or BBQ bits, this storage bench keeps everything tidy while doubling as stylish seating.
Materials You’ll Need:
- Timber panels (decking boards or plywood for the sides, base, and top)
- Framing timber (2×2 or 2×4) for internal structure
- Piano hinge or two standard hinges (for lid)
- Wood screws (50–75mm)
- Outdoor wood stain or paint
- Clear sealant
- Optional: gas struts or chain to help open/hold lid
- Outdoor cushion (optional)
Suggested dimensions:
Length: ~120cm | Width: ~45cm | Height: ~45cm (standard bench height)
Step-by-Step Instructions:
Step 1: Cut Your Timber
You’ll need:
- 2 long side panels (front and back)
- 2 short end panels (left and right sides)
- 1 base panel
- 1 lid panel (same size as the base or slightly larger)
- Framing pieces for the internal support (around the inside edges)
Sand everything before assembly.
Step 2: Build the Frame
Use your framing timber to create a rectangle matching the footprint of your bench. Screw the long and short pieces together to form a solid base.
Then build a matching top frame (same size), which will support the top edge of the panels and lid.
Step 3: Attach the Panels
Screw the side and end panels to the outer edges of the base frame. Then add the internal top frame around the inside edge of the panels — this helps support the lid and keeps the structure rigid.
Lastly, screw the base panel into the bottom of the frame to fully box in the space.
Optional: Drill a few small drainage holes in the base if the bench will live outdoors and isn’t fully waterproof.
Step 4: Install the Lid
Position the lid panel on top and attach it with a long piano hinge or two standard hinges along the back edge. Make sure it opens smoothly.
Upgrade tip: Add soft-close gas struts or chains on either side to help hold the lid open and avoid finger-pinches.
Step 5: Sand, Paint, and Seal
Give the whole bench a final sand, then paint or stain it to match your style. Finish with a weatherproof clear sealant for protection.
Add an outdoor cushion on top for extra comfort.
Customisation Ideas
- Add handles on the sides for easy moving
- Paint the inside a bright contrasting colour
- Add dividers inside if you want separate storage areas
- Use panel moulding or trim to give the bench a more decorative front
This bench finishes off your garden like a cherry on top. It’s functional, it’s attractive, and it clears up the clutter while adding extra seating. What’s not to love?
Tips for Customising to Fit Your Style
The best part about building your own garden furniture? You’re not stuck with someone else’s taste. Whether you want coastal calm, modern minimalism, or rustic farmhouse vibes, your projects can (and should) reflect your personal style. Here’s how to take your DIY builds from functional to you.
1. Use Paint or Stain to Set the Tone
The finish you choose has a huge impact on the final look. Here’s a quick style guide:
| Look | Paint/Stain Suggestion |
| Modern Minimalist | Charcoal, black, or pure white paint |
| Rustic Farmhouse | Weathered grey stain or natural wood oil |
| Coastal or Boho | Soft blues, sage green, or whitewashed stain |
| Bold & Playful | Mustard, teal, or even terracotta paint |
Tip: Always use outdoor-rated paints and stains, and finish with a UV-protective clear coat if you’re using light colours.
2. Add Cushions and Fabrics
Soft furnishings take your builds from “home project” to “designer space.”
- Use weatherproof cushions in bold prints or neutral tones
- Add seat pads to benches and lounge chairs for comfort
- Drape an outdoor throw or rug under a coffee table to anchor the area
Want a pulled-together look? Pick one base colour and add 2–3 accent tones that repeat in your furniture, pots, and fabrics.
3. Mix Materials for Texture
Wood is the base, but adding other elements gives your projects more depth.
- Use metal handles or legs for an industrial edge
- Incorporate rope or leather for a coastal or modern twist
- Add ceramic tiles to tabletops or tray inserts for a Mediterranean feel
4. Accessorise with Intention
Small touches make a big difference:
- Add hooks or rails to a bar cart for hanging tools or towels
- Attach a magazine holder to the side of your lounge chair
- Hang solar lights or string bulbs around or on the furniture
- Use plants strategically — tall grasses, hanging pots, or potted lavender can soften edges and fill space
5. Don’t Forget Function
Customising isn’t just about looks — it’s about making your furniture suit you.
- Want more storage? Add a shelf under your bench or table
- Need shade? Build a frame to drape fabric or install a parasol holder
- Cramped space? Add folding legs or make builds modular so you can move or stack them easily
The bottom line? Customisation is where your creativity comes in. Think of these projects as a blank canvas — the basics are done, but the personality comes from you.
Common Mistakes to Avoid
Even the simplest DIY garden projects can go sideways if you’re not careful. These are the most common slip-ups people make — and how to avoid them so your furniture lasts longer, looks better, and actually holds up when you sit on it.
1. Skipping the Sanding Step
Why it matters:
Rough timber = splinters, uneven finishes, and paint that peels.
Fix it:
Even if you’re in a rush, give your wood a quick once-over with 80–120 grit sandpaper. It takes 10 minutes and makes everything look cleaner and feel smoother.
2. Using the Wrong Type of Wood
Why it matters:
Some wood just isn’t made for the outdoors. If it’s untreated or interior-grade, it’ll rot, warp, or fall apart quickly.
Fix it:
Stick to pressure-treated timber, decking boards, or wood marked as suitable for exterior use. If you’re unsure, ask your local DIY store staff — they’ll steer you right.
3. Not Sealing Your Wood
Why it matters:
Rain, sun, and moisture will damage even the best timber without protection.
Fix it:
Always finish your project with a clear sealant, outdoor paint, or weatherproof stain. And reapply it every year or so if your furniture lives outside full-time.
4. Overcomplicating the Build
Why it matters:
Trying to build something too complex with not enough experience or tools can leave you frustrated — or worse, with a wobbly chair you don’t trust.
Fix it:
Start simple. The most stylish builds are often the most straightforward. You can always upgrade or build a more advanced version later.
5. Forgetting About Drainage
Why it matters:
Planters and flat tabletops need somewhere for water to go. Without it, you risk water pooling, swelling wood, or killing your plants.
Fix it:
Drill a few small drainage holes in planters or slightly angle tabletops away from joints. And leave small gaps between timber slats to help water run off.
6. Not Checking Measurements
Why it matters:
You don’t want to finish your bench and realise it doesn’t fit the space — or worse, your patio door won’t open.
Fix it:
Measure twice, cut once. Sketch a quick plan. Check your available space before cutting anything.
7. Using Cheap Fixings
Why it matters:
Cheap screws rust fast. Wobbly hinges and brackets snap. And then you’re back to square one.
Fix it:
Buy exterior-grade screws, rust-resistant hinges, and sturdy castor wheels if needed. They’re not that much more expensive and they’ll save you hassle.
Avoiding these simple mistakes means your project will last longer, look better, and — most importantly — feel like a win instead of a frustration.
Final Thoughts: Your Garden, Your Build
You don’t need a joinery qualification, a stack of power tools, or a five-figure budget to have a beautiful outdoor space. You just need the right project — one that suits your space, your skill level, and your style.
Whether you build one piece or tackle all seven, you’ve now got a toolkit of ideas that are:
- Easy to follow
- Affordable to make
- Customisable to your taste
- And genuinely useful in your garden
The most important part? Start with one. Build a bench, try a crate table, or put together a foldable side table. Once you see what you can make with your own hands, confidence builds quickly — and so does your garden.
Your outdoor space is more than grass and a few chairs. It’s where you unwind, host friends, drink coffee, read books, and let life slow down for a bit. Why not make it feel just as intentional and inviting as the inside of your home?
You’ve got the plans. You’ve got the know-how.
Now you just need a free afternoon — and maybe a cup of tea.
Alex is the creator of Homely Haven, a space dedicated to simple, stylish ideas for interiors and gardens alike. With a passion for cozy living rooms, inviting outdoor spaces, and practical DIY solutions, Alex shares tips and guides that help turn any house into a true home.
From budget-friendly decorating hacks to weekend garden projects, the goal is always the same: to inspire you to create spaces that feel personal, beautiful, and welcoming. When not writing, Alex is usually rearranging furniture, sketching new garden layouts, or exploring design trends for the next project.